Butter100fly (talk | contribs) No edit summary |
Butter100fly (talk | contribs) No edit summary |
||
| Line 8: | Line 8: | ||
== Explorer == | == Explorer == | ||
[[Image:explorer_cmd.png]] | [[Image:explorer_cmd.png|500px]] | ||
== Start Command == | == Start Command == | ||
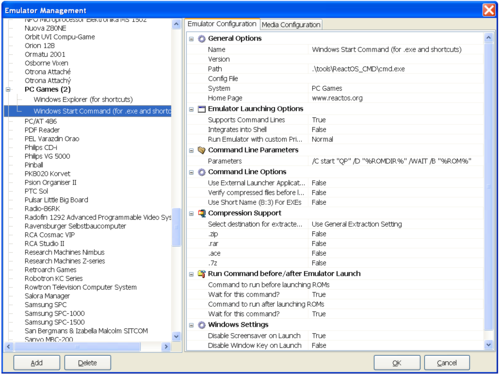
[[Image:start_cmd.png]] | [[Image:start_cmd.png|500px]] | ||
(Both 'Emulators' use ReactOS, which is an open source implementation of windows cmd that gets distributed with QuickPlay just for this purpose. You could just as well repoint the commands to the real cmd.exe in windows system folder) | |||
[[category:Emulator_Guides]] | [[category:Emulator_Guides]] | ||
Latest revision as of 19:38, 28 November 2017
Sample Settings
Emulators.ini instatiates on 1st run with ReactOS for PC Games (Start and Explorer)
A really annoying thing that can happen with frontends is that you end up having to create a lot of fake 'emulators' because the only way to start PC games is to have separate settings for each. To fix this, a new install of QuickPlay (and an EFind) will set itself up with two emulators under the system 'PC' for Start and Explorer.
These allow you to make calling a game and its parameters a thing that you put in your ROMLIST rather than in an 'emulator' i.e.: you can scan for each executable, and tell it to open with one of the two below and configure each 'rom' separately as you wish.
Explorer
Start Command
(Both 'Emulators' use ReactOS, which is an open source implementation of windows cmd that gets distributed with QuickPlay just for this purpose. You could just as well repoint the commands to the real cmd.exe in windows system folder)


